


The pièce de résistance.
EDIT: Whoa looks like Hackaday found this post! If anyone’s interested in learning more about this, I posted this on reddit and answered a bunch of questions here!
It’s been a minute hasn’t it? 🙂
A lot has changed since the last post (no more drones, moved to a new town, had a kid…), including the dumpster fire that is 2020. As of 7 months ago, the world changed in a completely unexpected way and during quarantine, I found myself craving a completely unexpected thing…
At Bresslergroup where I work, the office has always had a handful of coffee dorks (I use that term affectionately) and as a result, we have a fairly large amount of coffee production paraphernalia…including an espresso machine.

I must confess that when we first got the machine, I still thought it was pronounced “expresso” and didn’t have a clue about the differences between it and coffee. Over time, I learned the basics of pulling a shot, how grind profile and bean type affected taste and the actual extraction process…but mostly I just wanted that sweet, syrupy elixir.
It wasn’t until I was completely deprived of my usual mid afternoon caffeine break that I realized how much I missed espresso. I inherited a used hand grinder from a friend, bought some specialty beans for the first time in my life from a local coffee shop, and proceeded to make pourover each morning using the most jank setup my cheap self could manage:

Despite how it looks, this setup actually worked really well. Inconvenient? Mildly. Inexpensive? Oh baby, yes. Was I dogged with thoughts about whether or not this method actually brewed good coffee? Day and night. Although this managed to scratch the caffeine itch for at least a month, my overwhelming FOMO and the fortuitous closing of a local Sur La Table led to the (very cheap) purchase of these two goodies:

Things are starting to look a little bit more respectable.
I had heard a lot about the much lauded AeroPress, especially from James Hoffmann (a veritable David Attenborough of all things coffee, quite a delight to listen to!) who highly recommends the brewer due to how forgiving it is with producing great coffee, even with subpar technique. After trying it for a few days, I realized I didn’t much like the taste of immersion brewing and turned my attention to its much flashier partner, a Melitta style #2 coffee filter cone. Now I could finally make pourovers for guests without having to apologize for my janky setup.
None of this was espresso though and despite being cheaper, manual espresso machines like the Flair and highly regarded Cafelat Robot were both well out of my budget (I mean c’mon, I spent an embarrassing amount of time at the supermarket debating whether or not I should spend one cent more per filter on unbleached paper vs. bleached paper). I found myself falling deep into the rabbit hole of coffee research, digging up old Home-Barista forum posts, reading Amazon reviews of products that claimed to make espresso, and binge watching videos on tamping techniques, grinder types, and even roasting coffee. The more I read, the more I realized that the cheapest way to do this was to just to DIY it.
And so, a week later, this was staring back at me in CAD:
Uhhh…what the heck am I looking at?
Maybe I should back up a bit and explain: what exactly is espresso? The short answer is “what comes out when you force nearly boiling water through finely ground coffee beans at very high pressure”. For a more eloquent and detailed explanation, read the wiki article. It’s what’s served in Italy when you ask for coffee or “un caffè por favore” because that’s where it originated (fun fact, if you sit down instead of waiting at the bar for your espresso, you’ll be charged more). It’s fuller bodied, more intense, and arguably more flavorful than regular ‘ol coffee and requires the aforementioned special (read: expensive) equipment to produce.

Mmmm doesn’t that just look so good?
The key to good espresso is the high pressure (among other things). Specifically almost 9x atmospheric pressure, or about 131 psi. For reference, your car tires are (only) filled to 30-35 psi! Most semi-automatic espresso machines like the one in your local coffee shop use high pressure water pumps to hit that pressure. Manual machines like the ones I talked about above need even more effort by requiring the user to manually press down on levers with moderate to high force to generate the same pressures. See below:
High pressure, high forces, long lever arms…all of that meant heavy and strong (read: expensive) parts which I was not looking forward to having to fabricate. Instead, I settled on the simpler idea of harnessing the power of compressed gas. Instead of using a high mechanical advantage lever to push a piston, compressed CO2 would be dispensed from a small and inexpensive 12g or 16g cartridge which would then generate the requisite pressure to properly extract espresso. This concept is not actually novel; both an unsuccessful kickstarter and a now-defunct handheld espresso maker (with a fanatical user base) employed this mechanism. (EDIT: See the end of this post regarding concerns about CO2 potentially affecting flavor)
What about the brew chamber? Well, in some lever designs which use conventional portafilter baskets and handles, the water chamber is separate by necessity which leads to more parts. I really loved the design of the Cafelat Robot basket, which holds both the water and the coffee grounds in a very simple setup that requires no preheating. Inspired by the Faema Baby lever machine from the 1960s, this setup, though unconventional, has a very loyal following. Just read all 2,834 posts on the Home-Barista forum for yourself.
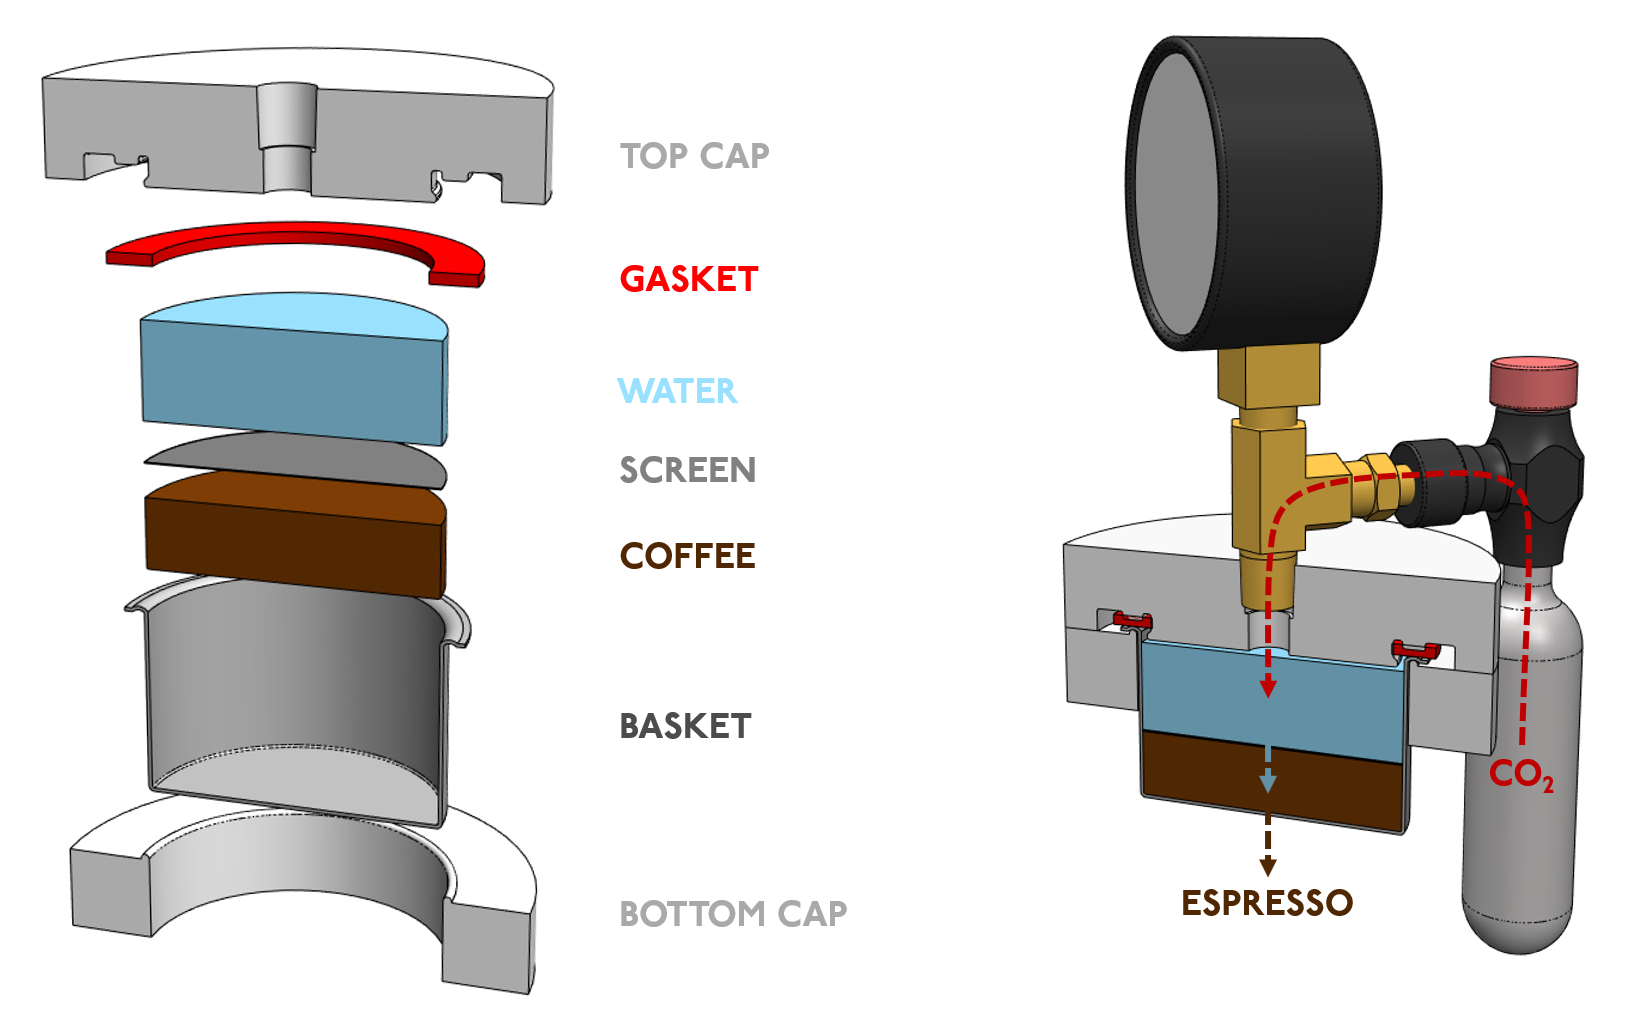
Here’s a confusing diagram to clear things up.
Seeing how the coronavirus was wreaking havoc on international shipping, I could not get my hands on a Robot basket cheaply and opted for an inexpensive Mr. Coffee 4 cup basket to just prove out the concept. The Top and Bottom caps were 3D printed at 100% infill and the gasket was cut out of some silicone I had laying around (really, it was an old silicone iPad case but who’s keeping track here?).
The first time I tried pulling a shot was quite a disaster.

Ah, I see the jank is back.
Let’s just say what came out was vaguely reminiscent of espresso. I didn’t drink it all but the taste was somewhere between very strong moka pot coffee and true espresso. Not quite what I was expecting but not a complete failure either? Further development would require better parts but with no end in sight to the coronavirus or its effects on international shipping, I decided to shelve this project.

One of the aforementioned coffee dorks from work. <3
Eventually (months later), a US based retailer restocked their Robot baskets and after a couple days, I had these beautiful pieces of stainless steel in hand and got to designing right away.

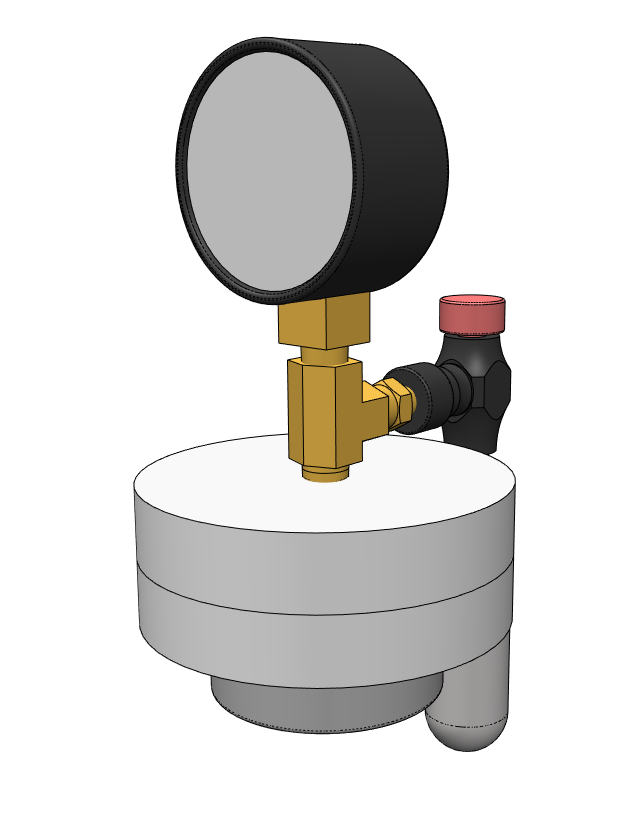
The most expensive part of this project so far…at $25. Yes, I know I’m cheap.
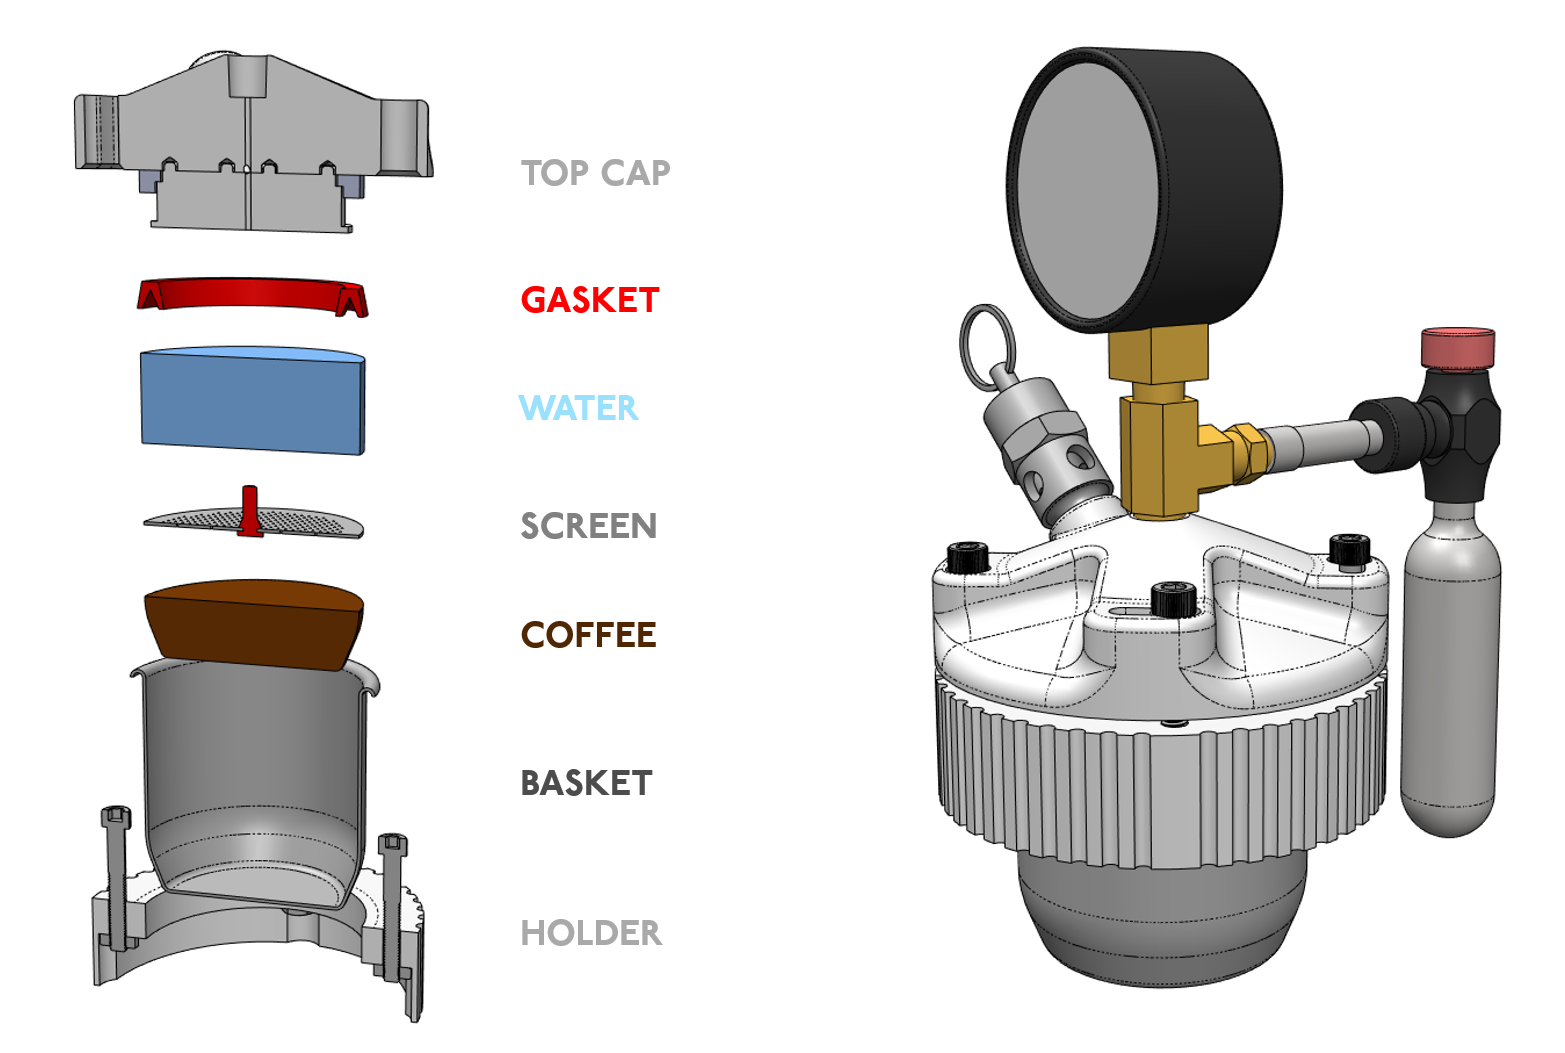
My first pass at version 2 implemented some very necessary upgrades for usability. In lieu of the cheapo harbor freight clamps, 3x shoulder bolts were integrated to act as a bayonet mount of sorts. The face seal in the proof of concept was swapped out for a piston V-ring seal to avoid the need for excessive clamping forces to maintain sealing.

Starting to look promising…
Both top and bottom parts were to be machined out of stainless steel (lower thermal conductivity than aluminum) from a vendor I often use in China who can CNC parts for ridiculous prices. The design was optimized for cost, with minimal need for refixturing. I shot the parts off for quote and received this back a day later:

In case it’s not immediately obvious, custom CNC parts from stainless steel for only $102 is insane. A US vendor would surely have charged at least 4x as much. Is it cheap? You betcha. Is it cheap enough for this cheapskate (thumbs pointing at self)? No way. After accepting the fact that my aversion to spending money was almost certainly going to cost me more in time, I resignedly began to work on version 3 which needed to be something I could 3D print for “free”.

There’s something delightfully meta about designing coffee gear while listening to the hoffMan himself.
Eventually, this is what I landed on: a 4-bolt “bayonet mount”, small diameter gas channels (to minimize dead volume), a separate relief valve to depressurize the chamber and prevent it from exploding if overpressurized, and of course the same gas dispensing system as before.
Just a tad more complicated than Version 1.
Both the Top Cap subassembly and the Holder needed to be easily 3D-printable in plastic on my old 3D printer while still being strong enough to resist the 650 lbs of force that high pressure gas would exert on the brew chamber. The design was run through a number of FEA simulations to ensure it would be able to resist exploding during brewing (plus a safety margin).
 Blue good, red bad.
Confident that the design (should) hold under pressure, I threw it on the printer for a 9 hour print.

You see a cool 3D printer. I see an extruder that’s about to jam. Yay.
You’d think I’d finally learn my lesson about being cheap and upgrade my 4 year old printer after five failed attempts at printing the parts but you’d be wrong. Days later and a bit of assembly, here we are. Exciting!

We’re getting closer!
I quickly loaded up a CO2 cartridge, opened the valve and……hisssssssssss. No matter what I did, I could not get it to stop leaking. Soapy water showed leaks coming from everywhere, including places where there were no special features! I had never had issues printing water or airtight parts before but a pressure vessel? This was a first.

Starting to regret not going with stainless steel…
I spent the next two weeks chasing my tail trying to figure out what was wrong, After redesigning and reprinting parts, removing the relief valve, and replacing the gas channels with tubing, I was finally able to get the darned thing to seal decently well.
With great trepidation, I loaded 18g of finely ground coffee into the basket, tamped it down with the shower screen, loaded 60g of hot water, capped and locked the top cap, and opened the CO2 valve. After about 3 seconds of gurgling, I started to see some dark brown liquid drain out of the basket. 20 seconds later, I’m holding my first successful shot of espresso. SUCCESS!

You can’t tell but this is in my bathroom. Because it was 2AM.
And I didn’t want to wake the baby if it exploded.
The espresso was well extracted with great crema. With 18g coffee in and 45g fluid out, I was brewing at roughly 2.5:1 ratio, which is right in line with (or just slightly above) a standard espresso. Even the puck popped out perfectly!
Each pull takes about 2.6g of CO2, which is more than I anticipated but only adds about $0.15 to the total cost of the espresso. Here’s a video of the process from start to finish.
Dropping the kettle base was completely intentional.
Mmmmm slow mo….
I’m pretty happy with how things turned out but there’s still a lot to improve. For instance, how does this stack up to a semi-automatic machine? Does CO2 get dissolved into the espresso (probably not) and affect the overall taste? What about Version 4? Can CO2 consumption be further optimized? Lots of unknowns that will eventually get answered…either when this prototype finally explodes or I stop caring about being frugal, whichever comes first (probably the former).
Here’s a comparison for those of you who are interested in how this stacks up against all the machines I researched:

For now, I’m quite happy and casually working on version 4. If there’s enough interest, I’ll post a followup post on what improvements have been made (cough Industrial Design 101: How not to make things look ugly as sin cough) but I already have a bunch of different air pumps (both manual and electric) in house to test vs compressed CO2 and a smaller gauge to replace the comically large one that’s currently mounted. If it becomes reliable enough, I’ll post the 3D files/BOM or maybe even mold parts to sell. Who knows. Let me know in the comments below if you’d be interested!
(EDIT: Lots of people have asked about whether or not this would impart artificial acidity to the espresso. At such a high temperature, the solubility of CO2 is very low (see graph here). Also some have wondered about whether or not the liquid CO2 would lower the temperature of the water. Considering we only need 2g of CO2 and that it already boils before hitting the brew chamber (not to mention water’s insanely high specific heat), I have not noticed any noticeable drop in temp during extraction. I use compressed air now and also have not noticed a difference.)


